Excel TEXTBEFORE function – extract text before character (delimiter)
In this tutorial you’ll learn how to use the TEXTBEFORE function in Excel to quickly get the text before a specific character or word.
In older versions of Excel, this was more difficult. You had to first find the position of the character (like a space or comma) using the SEARCH or FIND function, then use the LEFT function to get the text before it.
But now, in Excel 365 and Excel for the web, there’s a new and much easier way — the TEXTBEFORE function does everything in just one step!
Table of Contents
Excel TEXTBEFORE function
The TEXTBEFORE function in Excel helps you get the text that comes before a specific character or word (called a delimiter).
If the delimiter appears more than once in the cell, you can choose which one to use. If the delimiter isn’t found, you can show your own message or return the full original text.
This function has 6 parts, but only the first two are required.
TEXTBEFORE(text, delimiter, [instance_num], [match_mode], [match_end], [if_not_found])
text (required) – This is the main text you want to get a part from. You can enter it directly or use a cell reference.
delimiter (required) – A character or group of characters that splits the text into parts.
instance_num (optional) – This tells which time the delimiter appears to use. Default is 1 (the first one). You can use a negative number to count from the end.
match_mode (optional) – This controls whether upper- and lowercase letters in the delimiter matter.
• 0 (default) – Case-sensitive (capital and small letters are treated as different).
• 1 – Case-insensitive (capital and small letters are treated the same).
match_end (optional) – This tells if the end of the text should be treated like the delimiter.
• 0 (default) – Only use the delimiter exactly as written.
• 1 – If the delimiter is not found, treat the end of the text like it is the delimiter and return the full text.
if_not_found (optional) – What to show if the delimiter isn’t found. If you leave this out, it will show a #N/A error.
TEXTBEFORE availability
Currently, the TEXTBEFORE function is only available in Excel for Microsoft 365, Excel 365 for Mac, and Excel for the web.
Excel formula to extract text before character
To begin, let’s learn how to use the TEXTBEFORE formula in the easiest way.
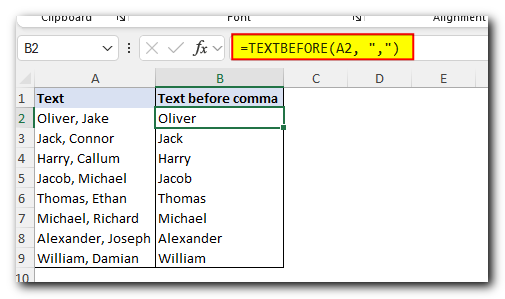
Imagine you have a list of full names in column A, and each name is written like this:
Last name, First name
Now, you want to take out just the last name — the part that comes before the comma.
That’s exactly what TEXTBEFORE can help you do.
That can be done with this basic formula:
=TEXTBEFORE(A2, “,”)
Where A2 is the original text string and a comma (“,”) is the delimiter.
Extract text before first space in Excel
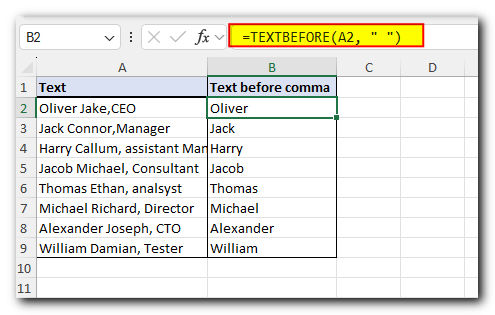
If you want to get the text before the first space in a sentence, just use a space (” “) as the separator.
For example, use this formula:
=TEXTBEFORE(A2, ” “)
This tells Excel to look at the text in cell A2 and return everything before the first space.
You don’t need to worry about the instance number, because it automatically looks at the first space unless you say otherwise.
Get text before Nth instance of delimiter
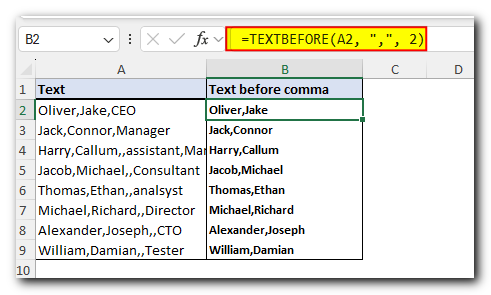
To get the text that comes before the 2nd, 3rd, or any other time a character appears, you can use the instance_num part of the formula.
For example, if you want the text before the second comma, use this formula:
=TEXTBEFORE(A2, “,”, 2)
This tells Excel to find the second comma in the text and return everything that comes before it.
Return text before last occurrence of delimiter
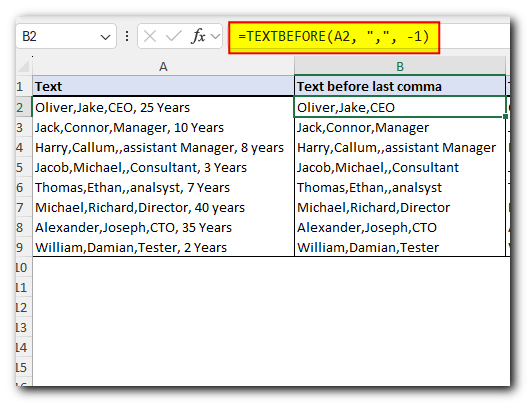
If you want to get the text that comes before the last time a character appears, use a negative number for instance_num.
For example, to get the text before the last comma in cell A2, use this formula:
=TEXTBEFORE(A2, “,”, -1)
This tells Excel to start looking from the end of the text and return everything before the last comma.
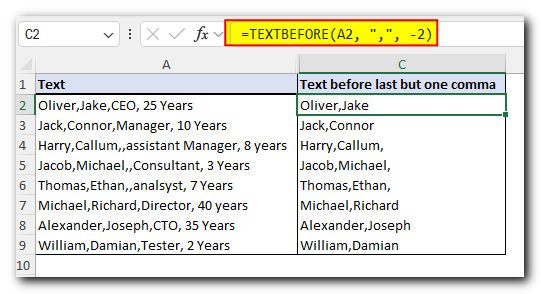
If you want to get the text that comes before the second-to-last comma, set instance_num to -2.
=TEXTBEFORE(A2, “,”, -2)
Extract text before substring
In the TEXTBEFORE function, the delimiter doesn’t have to be just one character — it can be a group of characters (called a substring).
This makes the function even more flexible and helpful!
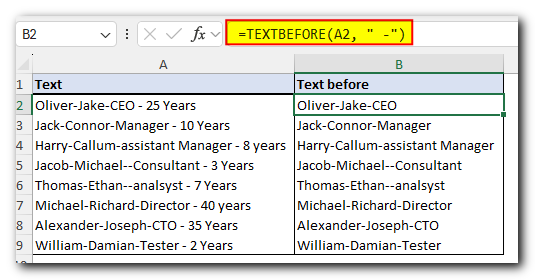
Let’s say you have a list where each employee’s name and job title are in the same cell, and they’re separated by a hyphen.
But some names, like “Mary-Jane”, also have hyphens in them.
To avoid splitting the name by mistake, you can use a more specific separator — like a space and hyphen together (” -“) — as the delimiter.
That way, Excel knows to split the text only at the space-hyphen, not inside names.
Here’s the formula:
=TEXTBEFORE(A2, ” -“)
This will correctly separate the name and position without cutting hyphenated names in half.
Get text before multiple delimiters
Sometimes, the text you’re working with might have different versions of the separator (delimiter).
To handle this, you can use a list of possible separators — called an array constant — in your TEXTBEFORE formula.
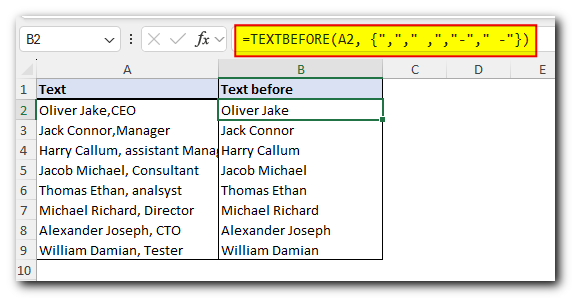
For example, if the separator could be a comma or a hyphen, with or without a space in front of it, you can cover all four cases by using this array:
=TEXTBEFORE(A2, {“,”,” ,”,”-“,” -“})
If delimiter is not found, return custom text
If the delimiter you’re looking for isn’t found, the TEXTBEFORE function will give you a #N/A error by default.
But you can change that and show a custom message or value instead by using the if_not_found option (the last one).
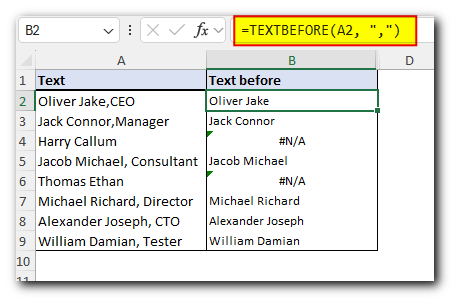
For example, if there isn’t a single comma in the text in A2, the basic formula will give you a #N/A error:
=TEXTBEFORE(A2, “,”)
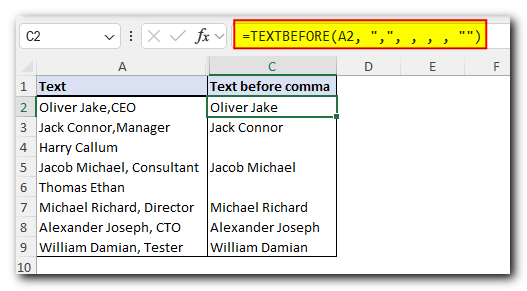
To get rid of the errors, type any text you want in the final argument, e.g. “Not found”:
=TEXTBEFORE(A2, “,”, , , , “Not found”)
To return nothing, i.e. a blank cell, use an empty string for if_not_found:
=TEXTBEFORE(A2, “,”, , , , “”)
If delimiter is not found, return original text
Sometimes, it’s better to just show the original text if the TEXTBEFORE function can’t find the character or word you’re looking for.
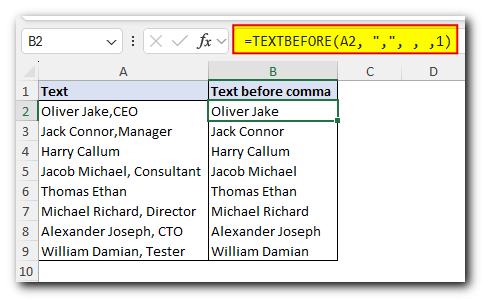
You can do this by setting the 5th argument, called match_end, to 1.
This tells Excel to use the end of the text as a backup delimiter. If it can’t find the delimiter you’ve specified, it will return the entire original text instead of an error.
=TEXTBEFORE(A2, “,”, , ,1)
In this example, if there’s no comma in the cell, the formula will simply return the full text (like the employee’s name).
Make delimiter case-sensitive or case-insensitive
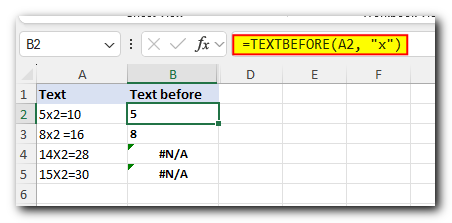
By default, the Excel TEXTBEFORE function is case-sensitive.
This means it treats lowercase and uppercase letters as different. For example, “x” and “X” are seen as separate characters.
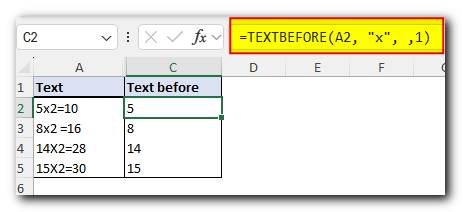
If you want to ignore case and make the function treat both lowercase and uppercase the same, you can set the match_mode argument (the 4th one) to 1 or TRUE.
For example, this formula will only recognize the lowercase “x” as the delimiter:
=TEXTBEFORE(A2, “x”)
Whereas an analogous formula with match_mode set to 1, recorgnizes both “x” and “X” as the delimiter:
=TEXTBEFORE(A2, “x”, ,1)
That’s how to extract text before character in Excel 365 with the help of the TEXTBEFORE function. I thank you for reading and hope to see you on our blog next week!


